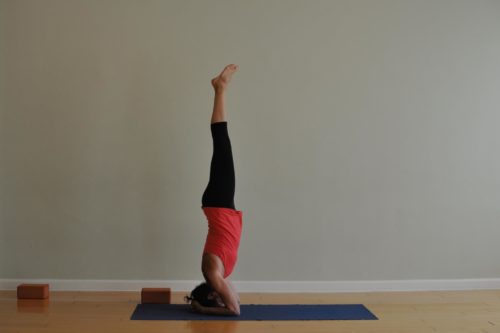
I had a question after class yesterday about how to do tripod headstand. I love getting questions after class because it shows a sense of inquiry about the practice. I had a few questions but I chose this one because it gives me a chance to talk about an anatomical theme in practice that applies to more than just inversions but definitely applies to inversions: the theme of fighting gravity.
In any upside down pose, we’re fighting gravity. The most obvious pose is Headstand or Handstand but it also applies to shapes like Plank, Low Push Up, Crow, Downward Dog; basically anything where the head is lower than the heart. It takes a number of different key actions in order to do an inversion safely and comfortably.
Now, while going upside down has some nice benefits, things like increasing blood flow to the brain and stimulating the lymphatic system (check out all the benefits here in this article in Yoga Journal), it also is a pose that people like to attempt because it’s a challenge. I’m all for challenges as long as you don’t get too fixated on them. Also, keep in mind that the results of yoga are cumulative; meaning, it’s hard to come to the mat after many months away or for the first time and expect to tackle all the poses. The good news is that as you develop the skill and coordination to move through the entire practice regularly, you’re building the skill to do any individual pose as well. This is because a yoga practice is built of many different anatomical movements and actions that build on one another. For example, wrapping the elbows in close to the sides while moving from High to Low Push Up activates the serratus anterior muscle. As it turns out, this is one of the key muscle we use in Crow Pose and Tripod Headstand, as well as Dolphin. So, doing one thing helps “many” things. This is one illustration of the intelligence contained within a yoga practice.
The challenge for many students though, and for this student I met with yesterday, is that they are looking for ways to fight gravity or as she said, “That feeling that my legs and shaking and I don’t feel steady away from the wall.” In order to do this, we need to engage more than “what is at the floor” and recruit MORE than that. If you think of it, there’s the obvious actions we can do in any pose. Those actions would be using the most obvious muscle or limb to create the shape. In Upward Dog, that would be the arms. The same would be true in Downward Dog. But when we start to think about ALL the other parts of the body that can assist us in these poses (core, legs, feet) we start to see how distributing the effort in any pose give the shape more integrity, helps us find a sense of ease, allows us to stay in the pose longer and with less effort. This is not always clear to a new student and even one with more experience unless someone has explained the theme. That’s why I love to have somewhat of an intellectual conversation about this first and then put the ideas into action.
With that in mind, let’s look at the key actions to take in Tripod Headstand and then I’ll share a video with you to bring it all to life. We’ll be approaching the pose from a straddle leg fold and you could do this against a wall or in the middle of the room:
- Hands should be shoulder width apart. Think of the alignment of Plank and Downward Dog.
- Wrap the elbows in close to the sides as in moving from High to Low Push Up. This will activate the serratus anterior and resist the effects of the trapezius to elevate the shoulder blades. The tricky thing to remember is that since you’re upside down, you have to resist the force of gravity to sink you into your cervical spine (neck), allowing the shoulder blades to move towards the head.
- Press actively into the floor. This is key to fight the effect of gravity. The easiest thing would be to sink towards the floor but you’ve got to actively push down in order to protect the neck. This also shows up in Plank, moving from High to Low Push Up and Crow.
- Engage the core, specifically the rectus abdominus. This is one of 4 muscles of the core and it’s helpful in engaging the center line of the body, or the median line, due to its position in the core, running from the pubis to the sternum. Engaging this muscle by drawing the belly button towards the spine can allow the core to contribute to fighting gravity and that feeling of sinking into the neck.
- Activate the legs by actively pressing up through the balls of the feet. This engages the quadriceps as it helps create full knee extension. Activating the legs in this way also draws the effort up and away from the ground, continuing to contribute to fighting gravity and protecting the neck.
To see how all of this flows together, you can check out my video here:
Now, many of the same actions you need to use when moving from High to Low Push Up are the same actions you need to employ when moving into Tripod Headstand. I detail all of this and more in my mini-online course on Moving from High to Low Push Up:
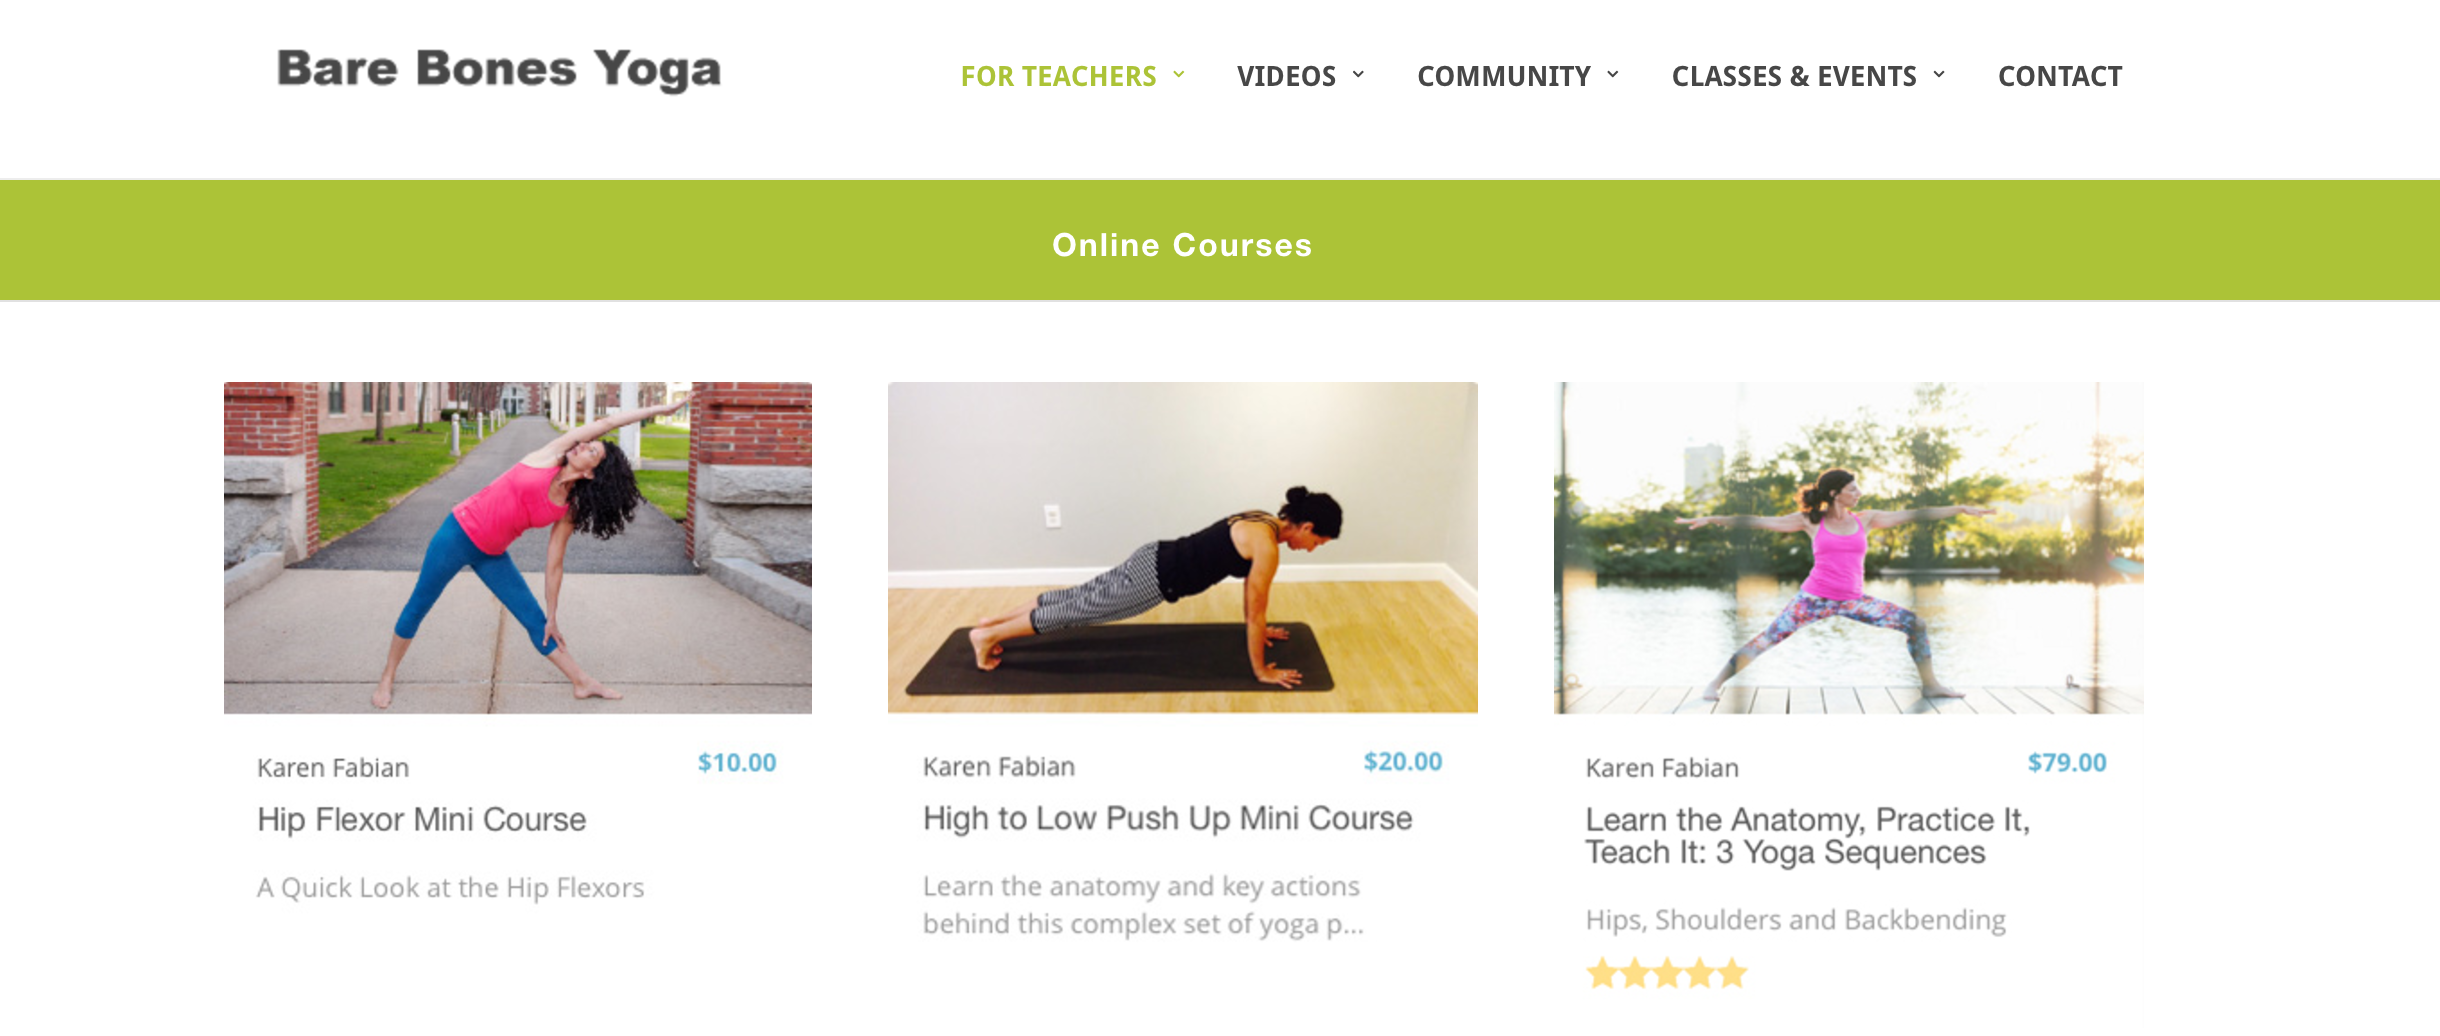
You can see the course here listed in the middle image and this is what you’ll see when you visit the online course page on my website:
Bare Bones Yoga Online Courses
This course is only $20 and will give you the key actions, the cues and the anatomy behind this movement. As so much of the anatomy builds up not only one pose but MANY poses, this course will give you key information (and non-contact CEUs) to use in much of your practice and teaching.
Thanks for reading and send any questions along that YOU might have about practicing or teaching by commenting here or sending me an email via karen@barebonesyoga.com.Â