I got an email the other day from a yoga teacher who asked:Â
“I am interested in your opinion on hip openers. My students love them but I hear that they can loosen the joint and I’m conflicted about teaching them. What are your thoughts?”
Well, first of all, I LOVE this question! This question says to me that this teacher is thinking critically about what she is doing. This can be hard when, as a teacher, you may be feeling some pressure to teach in a particular way because of what’s popular, trending on the social networks or is requested by your students. But I promise, if that is what guides your teaching, it’s a very slippery slope to start to go down. I always suggest that as teachers we find our own way, study, train and find our own authentic way to present this wonderful practice and we stick with that. That becomes our mantra, our style, our way of teaching.
Now, does that mean we might not shift our teaching over time? Of course we might! Being a teacher of anything means we have a responsibility to continue to learn and evolve. But the forces that influence us should not be popular opinion (primarily).
So, having said that, let’s take a look at her question. Let’s start with the facts: What IS a hip opener? This is already a point of particular challenge for us, especially for me who teaches anatomy because people don’t always understand the common phrases (based in anatomy) that are used in yoga teaching. “Hip openers” are postures that move the hips into a “turned out” position. People may not  know but but that position is called “external rotation:”
In this image above, both hips are externally rotated. In some poses, ONE hip is in external rotation as in my right hip in Warrior 1 pictured below:Â

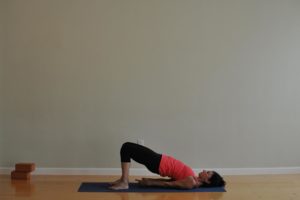
External rotation is different from EXTENDING the hip, which is the position of the LEFT leg in the Warrior 1 image above. It’s also the position of BOTH hips in Bridge, pictured below:
So, please keep this anatomy in mind, because often, when students say they have “tight hips,” you need to have them move around and show you what movement triggers the sensation. In this way, you can better clarify if it’s more related to hip extension or external rotation. Why does that matter? Because different muscles contribute to these movements.
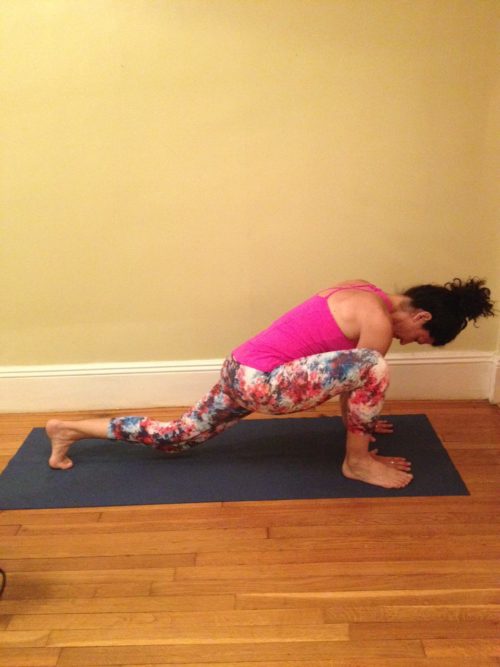
So, now that we’ve looked more at the different movements, let’s factor in another issue and that is this: The student’s relationship to gravity. In a pose like Warrior 1, pictured above, the student is standing; the pose is active. However, in a pose like Pigeon, which is basically like Warrior 1 but on the ground, the student is more passive:
Once we start to introduce the possibility of passivity and “relaxing with gravity” than yes, we do indeed introduce the possibility that people will impact the stability of their hip joint (what she calls, “loosening the joint” in her question above). Just to refresh your mind on the anatomy here, the right hip is externally rotating and the left hip is internally rotating.
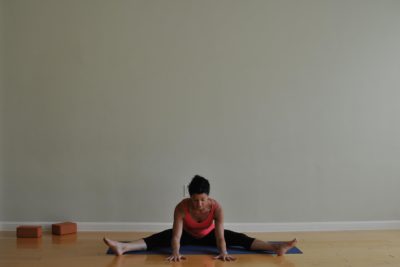
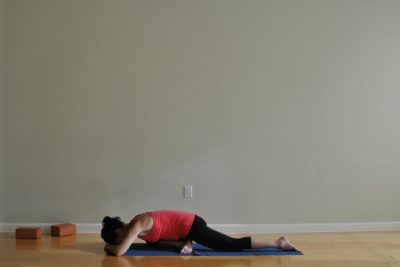
Let me also say that even in a low lunge posture, we could impact the stability of the joint, as you can see here:
Can you see how the pose lacks integrity? How I’m slumped rather than working to create steadiness? This is a common expression in many poses and can be due to many things. It could be that the student is uninformed about the correct way to do the pose. It can be that the student believes that moving in what he or she thinks is a deeper expression is better for them. It could be that they believe that going deeper and getting that feeling of “sitting” in the joints will create better length in the muscle and they believe they have “tight hips.” The list goes on and on. The best thing to do when you see this is go over and help them. Ask them what’s up, why they are approaching the pose this way. This is a great starting point for a conversation. Be sure you’re not approaching them from the perspective of, “I’m right and you’re wrong,” but more from the point of view of, “How can I help.” I never try to force my understanding on anyone. I only try to listen and share and then leave it to the student to make their own decision.
So, now that we’ve gone through some of the anatomy and some of the factors involved in this scenario, let’s go a bit into the concerns from an anatomical point of view. When we look at the joints, the connections between bones, we see that there is a joint capsule, ligaments, tendons and muscle all surrounding the actual joint itself. The hip, like the shoulder, is a ball and socket joint, so it will afford us great mobility but with that comes great responsibility. We can abuse that flexibility (intentionally or not) by moving too deeply into a pose. What that can do, over time, is wear down and loosen the structural components of the joint:
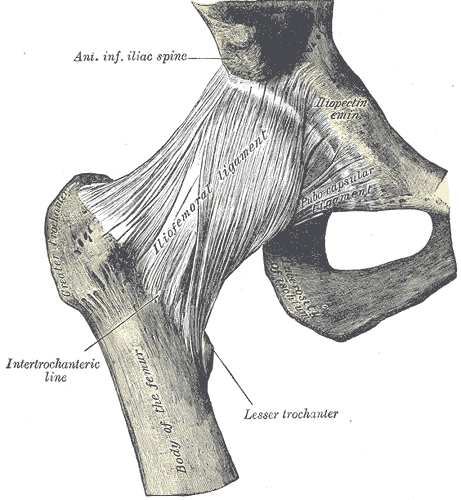
As with all joints, the joint capsule and associated structures like ligaments, are there to protect the joint but they are not vascular, like muscle. So, if we overstretch something like a ligament, it lacks the ability to bounce back. That’s why oftentimes, when athletes damage their joints, the trainers work to build the muscle around the joint. It’s a great compensatory strategy but it can only do so much.
Also, we need to recognize that some students are very mobile, double jointed or even hypermobile due to an underlying medical condition. So, in these students, they need to be extra cautious when moving into passive poses or any pose really, where the joint can possibly be compromised.
As with everything related to yoga, all of what we know, all of what we learn, is applied to individual students with varied background, experience and bodies. As teachers, we don’t know all of what’s happening with their physical structure so an approach to teaching that is mindful and more “middle of the road” will better ensure that everyone in the class will be safe and steady.
As teachers, we also all have varied understanding of anatomy. So, when I work with teachers and teach anatomy, I always start from a high level, meaning, starting from the perspective of some of the basics and then diving more into the details. I want everyone I work with to take away something they can immediately implement without having to study for hours on end. So, with that in mind, here are some tips:
- When teaching anything related to external rotation of the hips (since that’s what we’re talking about here) LOOK at the student in the pose. Every pose needs to have a shape, including the poses on the ground. Nothing should look as if the person is sleeping or just completely resting, unless of course, they’re in Shavasana. Suggest adjustments and use props to bring more integrity to the shape and more balance ( between right and left sides). This alone can make a huge difference in poses close to the floor.
- Suggest the use of props when necessary. In the image of me above in that Low Lunge, I would be right to use a block under my hands. This would allow me to bring more integrity to the pose and lift my back thigh up. It would allow me to have a bit of leverage to push down into the floor while engaging my core so as to prevent that “sinking” feeling in the hip. In that Seated Straddle pose above, I could sit on a blanket if I found I was sitting in the hips or the lower back.
- Encourage use of muscle to protect the joint. Just as in the example above about the athletes, bringing muscular action to any pose will protect the joint. And, it’s not often JUST the muscles that are around the joint but other muscles as well. Think about how engaging the muscles of the core can help prevent sitting in the hip joint, as well as engaging muscles of the thigh as we “roll open the hip.” I’m not going into all the detail of “which muscles” because I want you to see how you can cue to anatomy from a high level and still make an impact.
If you want to learn in more detail, that’s great! My online courses cover both the high level and the detail and give you practical tips you can immediately start teaching in your classes. I have 3 courses: One on hips, one on the anatomy and actions of moving from High to Low Push Up and a 3rd course on hips, shoulders and backbending. They are priced at various price points ( the first one is only $10!) and, as a Yoga Alliance Continuing Education Provider, you will earn CEU’s for completing any of these courses. If you’re interested, you can check them out, read the reviews and purchase them here:
Bare Bones Yoga Online Courses
If you’d like to review a quick presentation on how to bring more anatomy into your teaching, you can download a free presentation below. Thanks for reading!
Thank you for covering this topic Karen! I found this information exactly what I was looking for. I plan on cueing these poses alittle differently to stress not sitting or sinking into the joint!
Namaste!
Jackie
Jackie, thanks so much for the question and the inspiration for me to write the post. Keep up the great work! Thanks, Karen