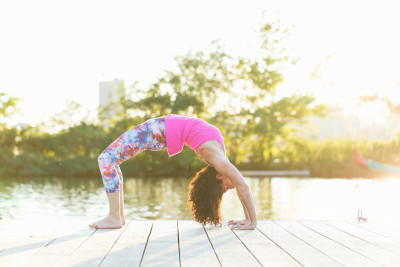
I’ve written before about backbends and the need for internally rotating the thighs when moving into backbends like Bridge and Wheel. In these movements, we want to keep a more broad space in the lower back, specifically around the sacroiliac joint, and in order to do that, it’s helpful to keep our feet parallel.
You can try this yourself if you stand up and just reach your arms up and start to do a standing backbends. Try it with your feet turned out (hips externally rotated) and try it with your feet parallel. For most people, they will feel compression in the lower back when taking this movement with the hips externally rotated. Please keep in mind; it doesn’t mean you can’t bend backwards with your feet turned out…. it’s just a matter of what kind of ease do you feel when taking this movement.
Anatomical actions and cues around “keeping the feet straight” or “internally rotate your thighs” or “roll inner thighs downwards” can all help and sometimes I actually have students squeeze a block between their thighs if we have foam blocks available ( I don’t do it with the cork blocks as they are too heavy). Also, keep in mind that it’s helpful to share with students as you have them use props in this way to explain why you’re suggesting it. If you don’t know, don’t suggest it. Sharing the rationale helps students learn more about the anatomy of the body and helps them connect your cues to the actions they’re taking and why. It’s transitioning from teaching from alignment only to teaching from anatomy and alignment.
I had a thought the other day that instead of having them squeeze the block between the thighs, how about just squeezing the block between their feet like this:
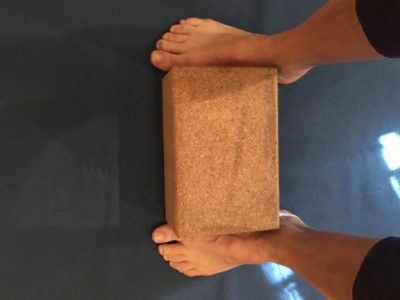
This works the same way as the block between the thighs but is a lot easier to set up and maintain. Cue students to root into the big toes, which will start that action of “inner thighs rolling down” and turn on their hip adductors and internal rotators (adductor magnus, tensor fascia latae and gluteus medius). Suggest that they maintain contact with the block along the inner edges of the feet.
While this might not seem groundbreaking, it does work. I’ve seen good results as I’ve watched students do it in my classes over the past week. They seem to be able to connect to their foundation with greater intention and action and are able to get up into the pose with greater ease. One of the things I love about things like this is it’s just a small shift; a little suggestion… but it allows me, as a teacher, to express creativity in my passion for sharing the anatomy behind yoga. Once you’re teaching for over 10 years, you want to find ways to stay engaged, interested and creative. Coming up with these kinds of tips will help you do that.
I also look to professionals outside the yoga industry in the exercise, sport training and physical therapy industries for techniques they use with their students, clients and patients. These techniques in movement used by these professionals can be easily transferred to yoga practice and while some of the movements might not be “yoga poses,” if they can reinforce a particular action you want to see in a pose, it can be helpful to work that into your sequences and teaching. I follow quite a few personal trainers, therapists and training centers on social media for a constant source of ideas.
If you like anatomy content like this, Â you might like my 3 anatomy based PDF’s. One of them is about backbends so it goes nicely with this article. You can download it below. Thanks for reading!
Interested in receiving a 3-PDF Teacher’s Yoga Anatomy Kit? Click here!