When I was a new yoga teacher, part of my training included assisting senior teachers in their classes. This was something for which I did not get paid but in exchange, I’d get to take classes for  free, on a one to one basis (one assisted, one free). This was a great way to learn the anatomy and alignment of the practice. It also was a wonderful way to learn from senior teachers as you would watch and listen to their teaching as you moved through the room. Most of all, it was a great way to be of service through the act of assisting students in class.
There are a number of essential assisting tips I have learned over the years and I outline them in Chapter 10 of my book, “Stretched: Build Your Yoga Business, Grow Your Teaching Techniques” (published on Create Space and available on Amazon and my website). Chief among them is to know the primary action of the pose and the essential assists that can be provided. When we assist someone, we can’t do everything that comes to mind. Can you imagine how crazy that would be for the student? Our hands would be all over the place; they’d feel completely overwhelmed and confused as to what we were trying to communicate, not to say distracted.
So, instead we try to select no more than 3 actions to provide, and even that might be too much. The chapter goes into other techniques we can employ but the overall point is we are trying to communicate without words and in such a way that we are respectful and not intrusive. But what happens when we are practicing ourselves? How can we, or CAN we, use assisting to help us reinforce the primary actions of the pose? And why on earth would we do this?
I had a bit of an epiphany while on vacation this past week and it was around this theme. As I blogged about in my previous post, I practiced every day and had time to explore different things in my own practice. When I teach anatomy to yoga teachers, I’m always looking for ways to present and refine what I know and most importantly, look for ways to bring the information to life. The study of anatomy is very heavy and can be overwhelming. I have a manual and teacher’s guide that I use and sell to studios and in it, I share the lesson plans I’ve created. While on the mat this past vacation week, I found myself working to reinforce the key actions of several poses (as much as I could) and also found that as I took each action, I could explore the anatomy, examine my range of motion, refine the alignment and reinforce in my head the muscles working to create the actions in the body.
I started to work with this technique further and wondered how I could bring this into class. The challenge with anatomical themes is that you don’t want to get so detailed you break the flow. A little “stop and explain” is good; a lot, not so much. Â So, with that in mind, here are some assists you can give yourself in order to deepen your understanding of the key actions in the pose. We’ll start with the shoulders in Warrior 1. Of course, there is only so much you can do. You can’t reach your back for instance, so you can’t do anything from there. But there are quite a few things you CAN do, so let’s explore this a bit.
The shoulders have very different ranges of motion  from person to person. I used to have a private student and he had the tightest shoulders I’ve ever seen. He literally could not reach his arms up at all. He was young, about 30-ish, and a long distance runner. You can imagine that the longer you run, if you don’t stay upright, you start to hunch. If you’re running long distances like this, you’re constantly shortening the muscles in the front of the chest (pectorals, anterior deltoid). Add in hunching over a desk all day and you shorten your muscles so much around the shoulders, you can’t reach up.
When we say “range of motion” (ROM) we’re referring to the ability for a muscle and a joint to move freely through its full continuum. For the shoulder, since it’s a ball and socket joint, it can move (therefore, the arm can move) through a whole circle. For details on the ROM of the shoulder, see this article:
http://www.livestrong.com/article/46391-normal-range-motion-shoulder/
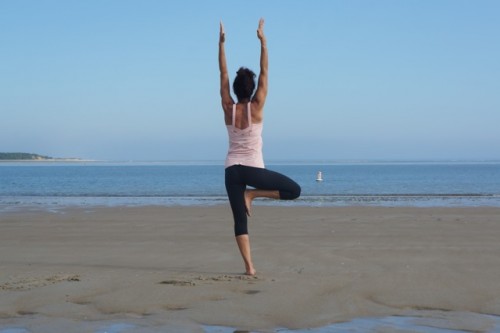
Different joints move through different ranges of motion. As people develop stiffness and inflexibility in the various muscles of the chest and shoulder (think: rotator cuff) it can greatly decrease their ROM in all the movements described in the above article (flexion, extension, abduction, adduction). But, when students hear the cues for poses where the arms are up above the head (flexion), like Warrior 1 for instance, they try to get their arms vertical (in line with their ears) and due to limitations in their shoulders (and hips), their pelvis tilts forward (anterior tilt), they stick their tailbone out (hyperextension) and their arms only lift so much. This is a perfect example of how limitations in one part of the body affect other parts in the context of yoga poses.
In order to give yourself a physical assist in the action of raising the arms above the head (flexing the shoulders) as well as notice and feel the flexibility in your shoulder joints, let’s look at Warrior 1 in more detail. As you come into the pose, keep your arms hanging at your sides. Work to get the foundation of the pose steady and the pelvis level. Then, reach your right arm forward, straight ahead of you. By doing this, you’re only taking a limited action before reaching your arm all the way up. This gives you time, especially early in your practice, to work slowly, rather than quickly. This is another thing that can confound students; they know where they want to go, physically speaking, so they rush into the pose. This is common; people often equate “the pose” as the key action, rather than the “process” of coming into the pose, which is almost more important. The full expression is a reflection of all you did before you got there, so if you rush, how much quality is there? (by the way, this is more evidence for practicing more slowly).
Once you have your right arm reaching forward, bring your left hand to your shoulder joint. Because it’s a ball and socket joint, the head of your upper arm bone (humerus) needs to be able to roll freely in the socket in order for you to get your arm reaching up. With your left hand on your right shoulder, coax your right arm up. Assist yourself into that action.
Now, to get your left arm up, you’ll need to use your right hand to help it, so do the same thing. Â Reach your left hand forward. Then, take your right hand to your left shoulder and coax it your arm up.
As you are using your hand on your shoulder, massage into your joint. Imagine that you are using the warmth created by your hand to soften the muscles that surround your shoulder joint. Even if you have no idea of the muscles themselves, think about the idea of molding clay as a visual or working with pizza dough. The softer you can get it, the more you can shape it. As you massage into your joint, watch what happens to the movement in your arm. Remember, the hand up in the air is the final expression; the action is coming from the joint so that’s what you have to get warmed up and more fluid. Feel for discomfort. Watch for the idea of “shoving” your arm up. Work slowly. Breathe deeply. Let go of the end result and instead be curious about the process.
Once you have done this once, move through High to Low Push Up and then switch sides. Take the other side of Warrior 1. Then, add in High to Low Push Up and start on the right side again. Without using your hands, resist the urge to reach up right away. Reach forward, take a deep breath and then reach up. Lift the front edge of the pelvis and hold for 5 breaths.
For the next round, work through Sun Salutation B by coming into Warrior 1 and reaching up without hesitation. Notice if the progression from slower pace to more “regular pace” (for you) along with the massage/self assist at the start helps your shoulders move more freely.
I’ll be focusing more on this technique in many of my classes over the coming weeks. As a pretty tight person myself in the hips, I find that when I use this technique in hip-focused postures, it helped me immensely. Keep in mind that your breath is key here and letting go of the end result is also critical. This will be a harder practice for students who tend to rush, resist change and are hesitant to trying new things. You might find yourself angry that you’re moving this slowly and looking to get to the “end game.” Stop, take a deep breath and ask yourself why this approach is pushing your buttons.
The practice of yoga is fairly consistent in terms of the poses themselves don’t change. It’s our approach to the poses that change, as our body and mind change every day. Also, we can take the same pose from day to day and emphasize different things. The approach described here is a shift in focus. This is one of the things I love about teaching; finding new ways to explore the same thing. It makes it seem new again and at least for me, reminds me why I love yoga so much. Oh, and the student that had tight shoulders? When we worked together in this way, by the end of our session, he could just about flex his shoulders completely. We worked a little wider at the top, but it was markedly improved. Thus, the magic of yoga.