I recently taught a private session with a woman who recently had a surgery to fuse two of the vertebra in her neck. Every once in a while, I get requests for privates from students that either have had surgery or are working with an injury. There are a few things I like to keep in mind and a few techniques I like to use when I work with students like this.
First of all, be sure you’re in full compliance with your yoga insurance, meaning your insurance is up to date. This goes without saying, really, but it’s worth mentioning. At no time should you be teaching without active coverage.
Secondly, it’s important to be sure that the student has been cleared by their physician for yoga. There is an important distinction to make between “I’ve been cleared for light activity” and “I’ve been cleared for yoga.” Being cleared for light activity usually means things like walking or housework. It certainly doesn’t mean Downward Dog or backbending. Be sure your client has specifically been cleared for yoga. Also, keep in mind that depending on the physician, they may have a limited appreciation for the different styles of yoga. They may be thinking of a restorative practice versus a heated power style, for instance. It’s helpful to be sure your client has been cleared for the style of yoga you’ll be teaching.
Next, consider if you know the client versus if it’s a referral from someone you’ve never worked with before. In my case, this was a student that has been coming to my regular classes for years and I have a good appreciation of her skill level, mobility and range of motion from observing her over that period of time. With a student that I did not know at all, I would be wary of working with them one on one without doing a pretty intensive screening process. I might even suggest that they come to a public class first and “take it at their own pace” unless their concerns were such that they couldn’t do a public class at all.
Before seeing a client, it’s helpful to have a conversation before the session as part of the screening. Find out more about what the surgery was for or what their injury is in terms of a diagnosis. Is it something that you feel comfortable with in terms of a working knowledge? If not, then this would be a time to be honest with the client and share that you might  be best to refer them to another teacher with a specific background. Find out if they are still seeing their doctor; if so, how often and for what kinds of follow up? Find out if they are involved in any rehab; things like physical or occupational therapy. If yes, ask what kinds of exercises the therapist is having them do. There are many yoga poses and sequences that can reiterate much of what is done in physical therapy and it can result in great transference and reinforcement between their P.T. sessions.
Also, as part of the screening, as them about their “activities of daily living” and how they feel while doing these kinds of things. Activities like getting up, personal care, standing over the sink in the morning, putting on socks, reaching to upper level cabinets, blow drying hair, driving.. you get the idea. You want to get a sense of how they feel and their ability to move in unloaded, non-exercise type scenarios. Also find out how they’re sleeping and where. If they’re still sleeping in the recliner post-shoulder surgery because they can’t lay flat in bed, that might be a red flag that it’s too soon for yoga. Also, find out if they have tried any other kinds of exercise: walking, jogging, biking, other kinds of classes. This is a positive sign, especially if it had no bad effects.
Also, let me stop here and add in a thought about what “yoga” can mean in this situation. We often think of “yoga practice” as taking on a specific form: Sun Salutations, backbends, balances, and so on. But yoga can also take the form of slow moving, seated or reclining poses, more meditation and holding poses longer and/or focusing on the breath. Working with students that fall into this category may challenge your own perception of what “yoga practice is” and should look like and may give you a chance to expand how you offer this time tested practice.
Moving on. Ok, so you know the student and/or you’ve done the screening and nothing stands out to you as significant in terms of working with the student. Also, you have a good sense of how you will approach practice in this first session versus waiting to get there and figuring it out once there. There will definitely be some of this anyway, but it’s good to have a tentative game plan. Keep in mind the approach is going to vary WIDELY depending on the nature of the injury. It’s impossible for me in this blog post to cover all of the possible modifications you could offer by injury type (plus video is much better for that). But, I will share some general things I keep in mind:
Think about ways you can start out the session that involve minimal effort but give you a chance to assess range of motion. For instance, in my case, my client felt okay laying on her back so I started her there with her feet flat, as if she were going to do Bridge Pose. I had her start with a few deep breaths and then we did some movements of her arms up and back and then down again ( think “making a snow angel”). Basically, I wanted to see how she could move in the upper body while in an unloaded (as in NOT on her hands) position. Depending on the client, this could be sitting up, laying on the belly or even standing. The point is to start them out in a position where you can move a bit without making them work so hard.
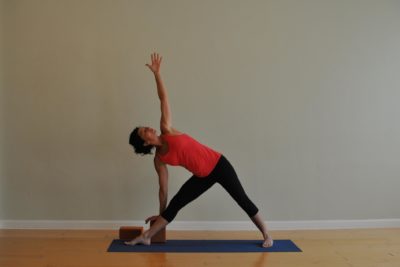
- Instead of trying to link poses in a “sequence,” think of poses as individual building blocks. Again, depending on the injury, you will have to use your judgment, but for instance, in my case, we did a number of standing poses, one at a time, and simply held them for 5 or 8 breaths. That was longer than what you’d see in a typical class but it gave me time to assist her, watch her and gave her time to give me feedback about how she felt.
- Provide TONS of modifications. Start at the most basic and only work up if the client is reporting they feel fine and even then, go very slowly. Things like “knee down lunge” instead of a full standing Warrior 1, Low Cobra instead of Upward Dog, working with hip width stance versus “feet together,” bringing hands to hips in twisting poses rather than having the client reach to the sky in a twist; keep gaze point down in a twist versus turning neck to shift gaze up. Also, use lots of blocks, blankets, straps and any other specific prop you have.
- Be sure the client is giving you feedback throughout the session. Depending on the client and how well you know them, they might “suck it up” and not report any discomfort. They may be really eager to “get back at it” and will want to push themselves. Keep in mind that less is more in these situation, ESPECIALLY for this first meeting. They might feel okay while there but the next morning will be sore. Watch for movements that are immediate “red flags” and think about other poses that require the same movement. For my student, when we did that first twist, she said, “Nope, that’s not gonna work!” and we stayed away from those for the rest of the session.
- End the session with a long rest and then time to chat afterwards. Ask them to email you the next day with a note about how they’re feeling. If there are specific things they want to do on their own, give them a list of a few poses you might have them try between sessions.
I hope these tips are helpful! If you enjoy this kind of content, you might enjoy my book, “Stretched: Build Your Yoga Business, Grow Your Teaching Techniques.” There is a whole chapter on working with special clients and also tons of content on teaching techniques overall. I also just released my new book, “Structure and Spirit: Moving Smarter Both On and Off the Mat” and it covers anatomy themes in yoga, so lots of what we’re discussing here is included. If you’re interested in these books, I’m happy to share them with you at a discount, versus having you buy them at list price on Amazon. Just email me for details!Â
Also, I’m going to make this topic one for a future webinar this month, so to stay on top of when that is, please join my mailing list via my home page. You’ll get notified of when the free webinar will be held.
Want a free PDF with these tips, condensed, into a form that you can easily print out and use for self-study or to create a sequence for your client? Click the logo below and I’ll email it to you!
Thanks for reading!