Once I shifted my teaching to focusing on the anatomy of the practice a few years ago, it made me start to question everything. There are many things I still question and I’m working to create my own understanding of everything that I offer, basing it in the science and the facts, versus simply, ” we do it this way because we were taught to do it this way.” I love studying the works of teachers who are doing this more and more as well and find that it’s so refreshing to see this inquisitive nature brought to yoga.
I teach different sequences quite a bit, depending on what I chose to focus on in class. It could be external rotation of the hips and shoulders, lengthening and strengthening the hip flexors, moving through the thoracic spine, backbends or any other anatomically based theme. But I’ve found that more and more, there are some really good reasons for starting people on their backs.
When I think about how most people spend most of their day, they do it sitting and hunching over a desk. Even if they are one of the ones lucky enough not to be doing this for 8 hours or more, chances are almost 100% that they spend a lot of their time hunched over their phones. This constant internal rotation through the shoulders shortens the pectorals and the subscapularis, one of the muscles of your rotator cuff:
You can see the subscapularis and pectoralis minor here in the above image.
So, the more we hunch, the shorter those muscles get. Then, you go to yoga class and someone suggests, pretty early on in the practice, that you come into Downward Facing Dog. You oblige, on your hands, with your palms pronated ( facing the ground ) and now, unless you use pretty good leverage to push the floor away, those muscles that are already shortened, shorten even more. You start to hunch and if there are no other alternative action oriented cues given to you, you’ll continue to hunch and further shorten those muscles. Sounds like fun, right?
So, many times, when I teach, I start students on their back. I don’t even really understand why we’d start people in Child’s Pose. I love giving students a rest mid-practice (especially for their arms) but that’s long after we’ve moved around a bit and they’ve connected to their bodies a bit more. But to start them hunching towards the floor doesn’t seem to make much sense to me. So, I love to start people on their backs. We start on the back, arms by the sides, palms facing up (supinated).
From this position, there is so much you can cue:
- Give people a chance to relax
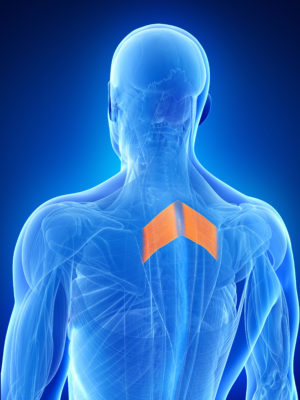
- Allow them to use the floor for support, rather than collapsing into the floor
- With the palms facing up, cue to move the shoulders down the back and gently squeeze shoulder blades together. This starts to activate the rhomboids, which are great muscles to help counteract the effect of hunching:
- Have them take a few deep breaths and use the action of deep breathing to expand the chest, stretch the pectorals and trigger the parasympathic nervous system ( here’s a good article that outlines why deep breathing triggers your relaxation response: Why Does Deep Breathing Calm You Down)
- Have them stretch arms back and legs out to release hip flexors
- Suggest they take a Cactus Arm/ Goalpost arm shape to add additional external rotation through the shoulder blades
- You can even suggest taking archer arms on one side ( also know as Cow Faced Pose arms) and then the other. Using the floor for support, they may have an easier time getting their upper shoulder externally rotated and their hand resting behind their head. After a few breaths, switch sides.
Now that they’re generally more grounded, relaxed and aware, there are lots of places you could go from here:
If I’m teaching a hip based sequence, I might bring them into Bridge Pose. This allows them to leverage the floor for support in beginning to lengthen the hip flexors.
If you’re teaching something that’s hamstring focused, you could take a Half Happy Baby shape on one leg ( to contract the hamstring) and then with the same leg, reach it up to the sky, wrap a strap around the in-step of the foot and have them take their leg out to the side, as in Reclined Hand to Big Toe Pose.
If you’re teaching a backbend based flow, you could have them lie with a rolled up blanket underneath them, in line with their spine to open the chest. You could then progress to having them lie on a block, resting it just underneath their shoulder blades (perpendicular to the scapulae), for an even bigger stretch through the chest.
I think one of the biggest shifts in my teaching of late, the more I dive into anatomy, is the recognition of the postural effects on the body of our lifestyle. I knew this before, as I’m sure you do as well, but regardless of that knowledge, I continued to teach the same sequence, without allowing the sequence to recognize where the students were at. When I teach any of the above sequences, I often share with the class why I’m doing it. I’m sure for some, they may be wondering, “Hey, when is this getting harder? Where’s the Downward Dog part?” So, in anticipation of those questions after class (or questions maybe never asked) I share the logic. I want people to understand what’s happening, why, and take the anatomy with them out into their life, so they can move smarter, all the time.
If you like this post, you might like my free e book on some of the basics of yoga anatomy. You can get it here:
Key Aspects of Anatomy for Yoga TeachersÂ
Namaste.
really enjoyed this article. I usually start my home practice on my back because it feels like the best way to loosen up my body. After reading your article it makes even more sense to me why it works. Thank you!
Kris, I love this! Thank you so much for commenting. I completely agree. I think there are many different ways to begin and as long as you have logic to support why you’re doing it, it can be helpful to have alternatives. Of course, there are many variations and that’s one of the nice things about yoga! Thank you! Karen