In my most recent post, I was sharing with you that I recently passed my Certified Personal Trainer exam, administered by the National Association of Sports Medicine. After teaching yoga for so many years, it was refreshing to get a different perspective on the body, with an emphasis on different things and an initial analysis of a student done in a very particular way. In yoga, there is much variation in how the practice is presented. In personal training, one of the steps that is consistent from trainer to trainer is the use of a postural assessment.
In the last post, I shared one of the common shapes you might notice when you do an assessment of a student. It’s called pronation distortion syndrome. You can read the post here. Today’s let me share another common postural syndrome: lower crossed syndrome.
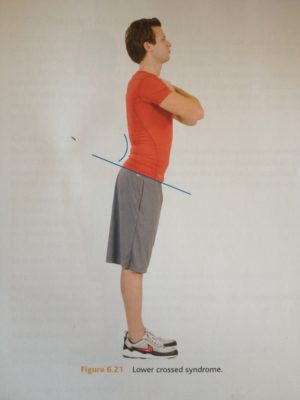
I was just talking to a student yesterday about this after class. He said he tried to assess his own posture by pressing his back against a wall and trying to see if his hips were level by having someone mark where the back of his hips land against the wall. This is a common practice when assessing posture in a student and can reflect an imbalance in the hips. Generally, what we see in lower crossed syndrome is a shape like this:

If you focus on the area of the hips, you’ll see how the lower back is deeply arched, which we refer to as a lordosis or “swayback.” Along with that, you’ll notice how the tailbone sticks out, which is referred to as “hyperextension” of the tailbone. The reason for this overly exaggerated arch in the back is a result of some imbalances in the muscles of the LPHC or the Lumbopelvic Hip Complex, a series of muscles in the lower back and hip.
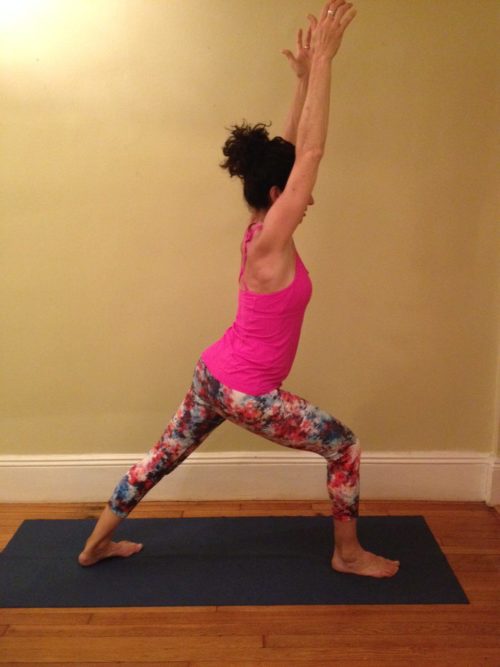
In yoga practice, you might see someone with this kind of postural position in Warrior 1:

This is a pretty common thing and often comes from hip flexors that are very tight and shortened. But let’s go through the overall picture in Lower Crossed Syndrome:
Shortened Muscles: gastrocnemius, soleus, hip flexor complex, adductors, latissimus dorsi (did you realize this one was involved?) and erector spinae.
Lengthened Muscles: Anterior tibialis, posterior tibialis, gluteus maximus, gluteus medius and transversus abdominus.
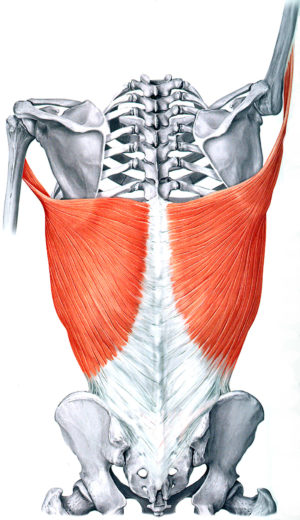
I highlighted the lattisimus dorsi in particular because we don’t always think of this muscle as one that can effect the position of the pelvis. But if you think of it’s position and placement on the body, it totally makes sense:

This broad, flat muscle literally starts on the LPHC and ends on the humerus, or upper arm. When you consider that and then look at a pose like Warrior 1, you can imagine that if it were tight, your tailbone would stick out and you’d thrust your chest forward.
So, now you have a better understanding of two of the common postural challenges you might notice in your students. The good news is that in a standard 60 minute yoga practice, taught with good attention to detail and correction of student positioning (so as not to reinforce either of the two things we’ve been discussing) a student can start to self correct. That, combined with massage and self myofascial release and you can really start to see a shift in the body to a more neutral, balanced position.
If you enjoy anatomy in the context of yoga, check out my brand new book, “Structure and Spirit: Moving Smarter Both On and Off the Mat,” now available on Amazon. My book will walk you through key anatomical concepts and then present themes of the spirit and personal development. Filled with images and pictures as well as meditation and journaling exercises, it’s a dynamic process of reading and contributing your own thoughts and meditations so reading it is like a self guided process.
Thanks for reading!
