If I had to pick one action we do a lot in yoga, it’d be moving from High to Low Push Up. In fact we do it so much and it’s filled with physical challenges, that I often suggest that people skip low push up whenever they want. Am I offering them a way out? Not really. I’m offering them a modification to provide better balance in the overall practice. Because of how often we move from High to Low, it can create some problems for the shoulders and wrists. This might exist even if we’re doing it correctly.
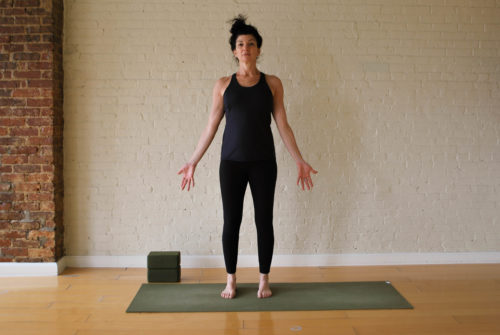
Let’s break it down. When we stand in Tadasana, or anatomical position, we’re in concert with gravity:

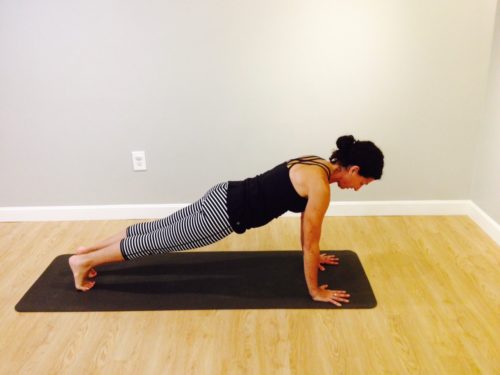
Once we do something like Plank, we’re fighting gravity:

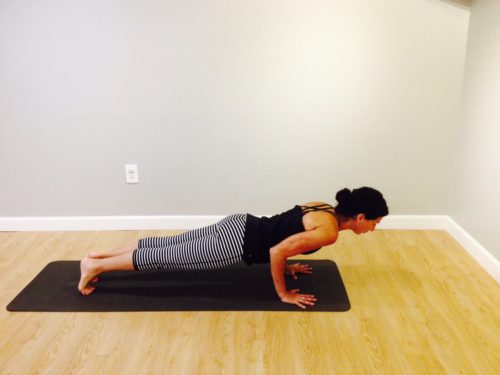
And then, once we move into Low Push Up, we’re fighting gravity even more as we hover close to the floor:Â

So, what can we tell our students to help them combat the force of gravity and give the whole process greater ease and integrity? We need to give them specific actions to take, including:
- Keep the head still
- Press into the floor when lowering
- Hug elbows into sides
- Stack elbows over wrists
- Engage core by hugging outer core inwards
- Squeeze thighs
- Press heels back
Now, that’s a lot to say and certainly more than you’d offer in one series of moving from High to Low. But you can give one or two cues, go through the Salutation and then the next time around offer another two. Working in this way helps to avoid overwhelming the students.
Also note these are all short, specific, action oriented phrases easily understood by most people. So, they’ll be able to try them out right away without that confusion that sometimes happens when people don’t understand the cue.
Now, you might be wondering, “Why do we ask people to do it this way?” Well, if you are, that’s a great question. One of my pet peeves is when I hear teachers teach something without sharing the “why.” It’s a lot harder for students and new teachers to learn for the long term and have it stick if they’re just hearing the cue without context.
Let me share that overall, we must take the load off the upper body somewhat if we are to protect the shoulders and provide a movement  that has integrity. How do we do that? By involving not only the muscles of the shoulders but also including the core and legs. We involved the core and legs by cueing #6, 7 and 8 and we involve the shoulders through cue #2 and 3. We protect the wrists, which are at the low point of this pose (therefore also at risk) through cue #4 and we create greater ease and integrity through implementing cue #1.
Now, there is STILL another level of detail behind all this which is the muscles that we’re calling upon to make this whole movement work. For that, I refer you to my online course on this subject called “High to Low Push Up Mini Course.”  This is a short course that will walk you through the whole process, including the muscles involved. It’s a very practical way to learn anatomy.
Now, how can we modify? Back in the day, I used to tell people to drop their knees to the floor. I don’t do that anymore. I simply offer to them to lower ALL THE WAY DOWN. In this way, IF they do it with integrity and by USING the correct muscles and by doing all the correct actions as above, they train the body to build strength in these muscles and therefore build the intelligence, coordination and strength to move to do it by lowering just a little bit.
Also, one more note: You don’t need to tell your students to lower “halfway down.” There’s nothing magical about that and in fact, the lower they go, the greater chances the poses lose their integrity. Just have them lower “a little bit.” When I teach, I usually lower them to the floor the first time, teach more in terms of anatomy and alignment and then the 2nd or 3rd time, offer it as “a little bit down” and say they can mix up going all the way down or a little bit down throughout the class.
If you’re looking for ways to learn more about anatomy you can also download my class on Vimeo which is filled with anatomical cues. Get it here.Â
Thanks for reading and please leave a comment!Â

Karen- i have both a comment and question regarding the post. In addition to the cues you mentioned, I have also heard “do not allow the shoulder to dip down lower than the elbow”. This helps reduce strain to the anterior shoulder joint and makes sense to me. However, you mentioned having students lower all the way down while still keeping those Chaturanga arms. Did I misinterpret that? Because in doing so the shoulder would certainly lower beyond the elbow and I think cause alot of added stress to the shoulder. I personally never lead high to low push up but that is my preference. At a recent teacher training I asked several of the trainees to show me how they do high to low push up and just what i expected, they all did it differently. I feel its something that is rarely taught properly. As a PT, I understand the damage that can be done over time when not done properly and with good form and strength. In large classes its something thats hard to observe especially because its done so quickly and sadly too often. Theres always that student that will push themself to do it even when they arent ready to. I only lead ” lower all the way down” but i dont have them use chaturanga arms. I have them lower through a regular push up. Perhaps Im doing them a diservice but I have a hard time leading something that may potentially cause them to come see me in a clinic some day with shoulder injury. Thats just my 2 cents. I enjoy reading your blogs….keep them coming!
Tracy, I love your comment and am on board with all you said! I think the part that I perhaps did not make clear is that when I suggest they lower “all the way down” I suggest they do it letting everything lower AT THE SAME RATE. That means there’s no “shoulders lower than elbows” which as you say, does indeed potentially create some problems for the shoulder joint as they come up to Upward Dog. Further, I do indeed have them lower in a traditional “low push up alignment” meaning I ask them to “come forward, then lower down” which keeps the elbows over the wrists, thus stacking those joints and preventing excess strain on the wrists. I do agree that if they lower and do NOT move forward first ( I’ve even seen students move backwards!) their elbows are in front of or even BEHIND their wrists, placing undue strain on the low point in the pose, the wrists! So, having said that, as you know as a PT, it ALL depends on many factors ( experience, overall conditioning, awareness, injury hx, etc) so we can’t say a problem will happen if x is not done, or Y is done, etc but these are guidelines. I hope this clarifies! Thanks for reading! Karen
Tips 2, 5 and 6 are great but there is a lot of controversy surrounding #3, hugging elbows to the side, tension of the latissimus Dorsi pulling on the humerus and the separation of the shoulder. Seems each student is different and that cue should be used with caution.
Carter, thanks for that input. I have not heard about this concern. As you know, the lats do insert on the humerus so I see that reference point but I’m not sure I see how it could lead to separation of the shoulder. In any event, all things vary from person to person and I always look to any tips as best applied in moderation but I will have to check into that one to see what the backstory is. Thanks.
Check out Adam Bellanger explanation; https://www.youtube.com/watch?v=iiGyHSznF_E&t=5s
Hi Carter, thanks for sending that video. I am in fully agreement and my post is in alignment (pun intended, lol) with what Doug is saying in his video. It’s indeed very important that the shoulder not lower below the elbows. This is what I was referring to in the comment below. We are trying to encourage students to lower everything together while wrapping the elbows into the sides. It’s as if we are standing in anatomical position, and we have our “low push up arms” in place and then we fell directly to the floor. In this way, we keep the head over the shoulders, there is no undue or overdone thoracic kyphosis ( the rounding of the thoracic spine as he outlines here) and therefore lower risk to the shoulders as we move from high to low. To do this for many students, all while only lowering halfway down) is quite difficult. It’s often because they are not using other parts of the body to distribute the effort. That’s why my cues include cues to the core and legs and feet to help the upper body move with integrity, rather then having that rounding of the thoracic and that sloppy, lazy cervical spine. So, in summary, the video and my blog’s contents are in agreement unless I am missing something. Again, I am very leery about making any statements to students that use phrases like ” this will always result in..” or “don’t do this because this will happen” because we know all student are different and there are many other factors involved, like the overall conditioning of the student, any prior hx of injury, level of experience, etc. So, again, I encourage teachers to know their anatomy. To know why they are suggesting what they are suggesting. To ask senior teachers why they teach it that way and be sure to really listen for the answer. And to be wary of statements that try to scare people or use firm words like “this will always result in..” type of thing. Again, it’s up to the student ultimately but I do believe that it’s our role as teachers to share our knowledge through our teaching/ cues/ demos/ etc. Thank you for sharing the video!