Think about what you do all day. And then think about how you first position yourself when you go into yoga class. If you’re a teacher, think about the most common pose you most likely start your classes with, if not initially, certainly after maybe one or two other poses. I’d be willing to bet that for many teachers, the pose that most often starts the class is Downward Dog. If not, bravo for you! I would further suggest that starting in Downward Dog can be a really stressful position for many students and one that further encourages an action that they do all day: hunching or internally rotating their shoulders. Downward Dog requires a good amount of shoulder strengthen as well as an ability to tap into a key anatomical movement: external rotation.
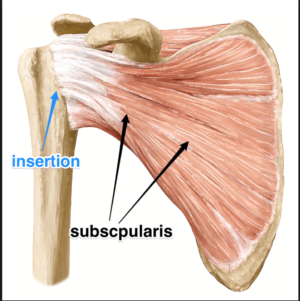
When you ask people to hunch, they know what that means. It’s not a position that you need to have extensive knowledge of anatomy to understand. They might drop their gaze, roll their shoulders inward and let their arms hang down. When doing that, many people might not know it but the technical term for the shoulder is internal rotation. This action of internal rotation is primarily done by a muscle called the subscapularis. This muscle sits on the inside of the shoulder blade: (Please note: This is looking at the FRONT of the body on the right side:

Because we hunch so much over our desk, computer and phones, this muscle as well as related, nearby muscles that share this function, get pretty shortened. It also means that for many of us, we get used to that feeling of hunching and not as familiar with the feeling of standing up, let alone taking the tops of the shoulders back and down.
When we look at a pose like Downward Dog or any pose where we are facing the ground we are asking our body to fight the urge to hunch. We’re not only “palms down” which encourages hunching, but we’re also fighting gravity so it’s even harder. Unless we’re aware of the counteraction to hunching and unless these muscles are strong enough, it’s hard to resist the urge to hunch.
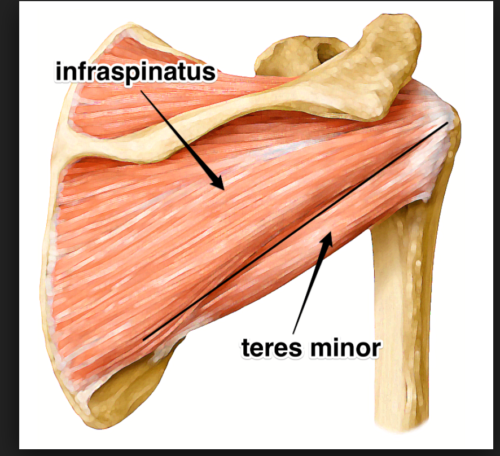
So, let’s take a look at the muscles that externally rotate the shoulders. Primarily, we’re referring to the teres minor and the infraspinatus. Both of these muscles connect your shoulder blade to your upper arm bone. Now, you might say, “How can a muscle that connects to your arm effect your shoulder?” Well, I’ll bet you know the answer and you just don’t realize it. Your humerus (upper arm bone) sits in your shoulder joint and is part of that joint’s infrastructure. As a result, any muscle that connects to your humerus can effect the position of your shoulder.
In the case of the teres minor and the infraspinatus, they both work to turn your humerus outward, or externally rotate it. If you roll the humerus outward, by default, you’re externally rotating your shoulder. Let’s look at the teres minor and the infraspinatus. This view below is from the back of the body and is the right shoulder:

You can imagine that as these two muscles contract, because they both insert on the humerus, they will roll the shoulder back or externally rotate it because of their pull on the upper arm. They act to roll the upper arm back, thus externally rotating the shoulder.
So now that we know that, what can we do to help our students strengthen these muscles? First, we need to tune them into their existence in the first place. I like to have people sit up and stretch their arms out in front of them. I ask them to spread their palms, as if they were in Plank Pose, but instead they’re sitting up with their arms outstretched. In this way, they can rotate their hands in and out and see and feel the effect on their shoulders.
I then have them come into Tabletop pose and keeping their gaze down at their hands, press into the floor and without moving their hands, press outward with both hands. This activates these muscles and will allow students to feel the contraction of the external rotators. I then move them into Plank and have them do the same thing. We then up the ante and I have them move from High to Low Push Up, while trying to keep some of that external rotation happening as they lower. This is usually the hardest part because moving from High to Low Push up requires the collaboration of muscles in both the upper and lower body in order to move safely and seamlessly through to Upward Dog.
Building this kind of progression exercise, based on anatomical knowledge and principles, comes from having not only a solid understanding of anatomy but being able to apply that knowledge to teaching. Further, it requires that the teacher have a way to present the information in understandable ways so as to not overwhelm the student. To further this idea, if the teacher can relate the actions taken on the mat to actions one can take in every day life to improve posture, then it stands to reason that the impact of that class on the student’s overall health will extend beyond what they do in the class to how they move in their daily activities.
If you’d like to learn more about the anatomy of the shoulder, I INVITE YOU to come to my workshop in Boston on May 19th. This 5 hour event will start with yoga practice, proceed to an anatomy lecture and then the discussion will shift to just this kind of thing: how to apply what you learned to teaching in practical ways.Â
This event will include breakfast, lunch and CEU’s for all Registered Yoga Teachers. If you sign up by May 4th, you’ll get my 200 page anatomy manual for free ($65 value). There are ONLY 10 spots for this workshop so sign up soon to get your spot.
This workshop will be presented in a fun and light way, will encourage your participation and will give you the key information you need to bring anatomy into your teaching. Focusing on the shoulders will give you critical information to help your students since so much of yoga depends on shoulder strength and stability.
To sign up for this one time workshop, click here.Â
Thank you for reading and hope to see you at the workshop on May 19th!
