I love when people ask me before yoga class, “Hey, I really would love if you’d focus on core today!”
To that I say, “Hey, I focus on core every time I teach!”
Because really, shouldn’t we have “core awareness” in every pose we do, with the exception of restorative poses like Child’s Pose and Shavasana?
Now, without getting into the different kinds of muscular contractions (eccentric, concentric and isometric), let’s just focus first on the idea of the “core” itself. And, to further help us frame this conversation, let’s focus on the 4 key core muscles, versus muscles that are in the center of the body but have other key functions besides being a muscle of the core ( for instance, the psoas, which is a hip flexor).
Overview
So, now that we’ve framed the discussion, let’s be sure we know the 4 core key muscles. What are the 4 key abdominal muscles? It doesn’t have a cool acronym like the rotator cuff (“SITS”) but there are four. They are:
- transversus abdominus
- rectus abdominus
- internal oblique
- external oblique
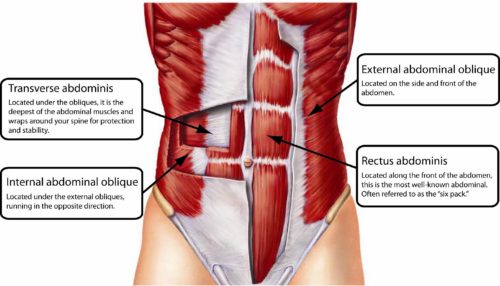
These muscles have key functions to assist you in activities of daily living as well as yoga. Just briefly:
- The transversus abdominus is like a corset around the body. It keeps the abdominal contents “in” and closely tucked into the body and supports the lower back. You can contract it if you focus on drawing the sides of the body inward;
- The rectus abdominus is that long line up the center of the body from the pubic bone to the sternum. Most like the “six pack ab” muscle in common vernacular, it contracts when we do an abdominal crunch;
- The internal oblique and external oblique work collaboratively in twisting motions. I wrote an extensive blog post on these muscles alone which you can read here.
So, now that we’ve outlined the muscles of the core, how is it that we can say that we use them just about all the time in yoga practice? Well, this gets to a broader concept in anatomy and yoga. It’s what I refer to as bringing “integrity to the pose.”
My point is this: If we want all the shapes of each pose to exhibit just the right amount of stretch and strength, AND if we consider the core to be, of course, the center of the body, then it pretty much stands to reason that in order for each pose to have integrity, or  “healthy shape”, we’d need to be using our core in one way or another, and one or some of these muscles at the same time. For if we’re not, the pose will most likely “slump” or not have what I call, “integrity.”
Here are some examples:Â
Cuing to the “center line” of the body in Tree pose (rectus abdominus)
Cuing to “drawing into the center line” in Triangle (rectus abdominus)
Cuing to “drawing the sides of the body in” when moving from high to low push up (tranversus)
Cuing to rotating through the right (or left) side body in Prayer Twist (obliques).
This also brings up a concept in yoga which has to do with the idea of cues from the “ground up” or the “center out.” I like to switch it up, depending on the pose, for instance. I like to think about how to cue depending on the pose I’m teaching. So, something like Tree pose works nicely when you cue from the “ground up.” But something like Triangle or Crow work nicely when cueing from the “center out.” These are just different things you can play with as you think about the best way to communicate with your class and help them tap into their anatomy.
If you’re looking for ways to bring anatomy into your teaching, check out my anatomy manual, The Bare Bones Yoga Guide to Anatomy. In this comprehensive 200 page manual, you’ll be taken through my breakdown of the complex subject of anatomy. We’ll start with key anatomical movements, review key joints, bones, muscles and then apply muscles to poses. We’ll then look at the practical application of anatomy to teaching because that’s where everything comes together. I added in special sections about working with students with injuries, assisting students and red flags to look for when teaching.
To get the manual, click here.Â
If you’re a teacher OR student and looking to understand how to apply anatomy to the postures, take my free course, The LEARN ANATOMY Challenge. This series of free videos on my You Tube channel will walk you through key aspects of anatomy. Get the PDF guide with links to the videos here.Â
Thanks as always for reading and please feel free to leave your comments here!